Published on October 7, 2025 · 7 mins read
Building an AI-Powered Object Detection System in Flutter.
From self-driving cars to smart shopping apps, object detection is quietly powering the world around us — and now, you can build it into your own app.
– By Hariprasath, AI/ML Developer, Yuvabe Studios

Introduction
From autonomous cars identifying pedestrians to e-commerce apps recommending products from photos,AI-powered object detection has become one of the most practical and impactful applications of artificial intelligence. What once required heavy infrastructure and complex pipelines can now be built with lightweight frameworks like Flutter and FastAPI, powered by pre-trained machine learning models.
At Yuvabe Studios, we wanted to demonstrate just how accessible this technology has become. In this blog, we’ll walk you through building a real-time object detection Flutter app that captures an image, sends it to a FastAPI machine learning backend, and returns AI-generated classification results — all in real time.
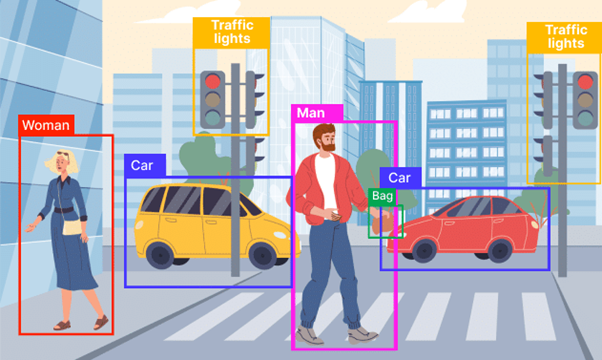
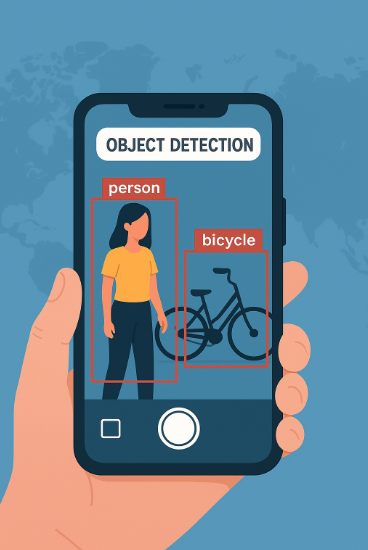
How Object Detection Works
At its core, an AI object detection system follows four simple steps:
- Image Capture: Pre-trained models for image classification, object detection, and more.
- Image Processing: Speech-to-text, audio classification, and transcription tools.
- Prediction & Classification: Tools like Stable Diffusion for converting words into visuals.
- Displaying Results: Models like CLIP that combine text, images, and audio in novel ways.
Think of it like asking a friend, “What do you see in this picture?” — except the friend is an AI model trained on thousands of images.
Technologies We Used
To keep things simple yet powerful, we combined the following stack:
- Flutter: (smaller variants): For the mobile frontend (UI + camera integration).
- FastAPI: (smaller variants): A lightweight, high-performance Python backend for serving the AI model.
- Florence-2-base: (smaller variants): A pre-trained model used for object classification.
- HTTP Requests: (smaller variants): To send captured images from Flutter to the backend.
This stack is efficient for prototyping but flexible enough to scale with advanced models like YOLOv8 or EfficientNet.
Setting Up the Flutter App
Follow these steps to build a Flutter app that captures images and communicates with a FastAPI backend for AI-powered image classification.
Step 1: Add Dependencies
In your pubspec.yaml file, add:
dependencies:
  flutter:
    sdk: flutter
  camera: ^0.10.5+4
http: ^0.13.6 Then run:
Run flutter pub get to install the packages.
Step 2: Implement Camera Functionality
We use the Flutter camera package to capture and send images for processing.Here’s how to initialize and use the camera:
CameraController? _controller;
String? resultText;
bool isProcessing = false;

@override
void initState() {
  super.initState();
  initializeCamera();
}

Future<void> initializeCamera() async {
  final cameras = await availableCameras();
  _controller = CameraController(cameras[0], ResolutionPreset.medium);
  await _controller!.initialize();
  setState(() {});
}

Future<void> captureAndProcessImage() async {
  if (_controller == null || !_controller!.value.isInitialized) return;

  try {
    setState(() { isProcessing = true; });
    final XFile imageFile = await _controller!.takePicture();
    var response = await ApiService().predict(File(imageFile.path));
    setState(() {
      resultText = response?['results']?.values.first ?? 'No response';
      isProcessing = false;
    });
  } catch (e) {
    setState(() {
      resultText = "Error: $e";
      isProcessing = false;
    });
  }
}

@override
  Widget build(BuildContext context) {
    return Scaffold(
      appBar: AppBar(title: Text("Capture & Classify")),
      body: Column(
        children: [
          Expanded(
            child: _controller == null || !_controller!.value.isInitialized
                ? Center(child: CircularProgressIndicator())
                : CameraPreview(_controller!),
          ),
          if (isProcessing) CircularProgressIndicator(),
          if (resultText != null)
            Padding(
              padding: const EdgeInsets.all(10),
              child: Text("Result: $resultText", style: TextStyle(fontSize: 18)),
            ),
          ElevatedButton(
            onPressed: captureAndProcessImage,
            child: Text("Capture & Classify"),
          ),
        ],
      ),
    );
  }
The build() method uses CameraPreview to display the live feed and shows the AI-powered app results after classification.
Implement API Service
On the backend, FastAPI handles the AI inference. Flutter communicates with this backend via the http package.
class ApiService {
  static const String baseUrl = "http://192.168.68.236:8000";

  Future<Map<String, dynamic>?> predict(File imageFile) async {
    try {
      var request = http.MultipartRequest("POST", Uri.parse("$baseUrl/predict"));
      request.files.add(await http.MultipartFile.fromPath('file', imageFile.path));
      var response = await request.send();
      if (response.statusCode == 200) {
        var responseData = await response.stream.bytesToString();
        return jsonDecode(responseData);
      }
      return null;
    } catch (e) {
      print("Error: $e");
      return null;
    }
  }
}This modular approach ensures you can later swap Florence-2-base with more advanced models like YOLOv8 or EfficientNet without rewriting the entire app.
Final Thoughts: Why This Matters Beyond the Demo
This project demonstrates more than just code — it shows how real-time object detection in Flutter is no longer limited to big tech companies. With frameworks like Flutter and FastAPI, even startups, researchers, or niche businesses can build AI-powered apps in days, not months.
How You Could Take This Further
- Upgrade Models:: Replace Florence-2 with YOLO for real-time detection.
- Visual Feedback: Display bounding boxes around detected objects.
- Accessibility: Add text-to-speech so results are read aloud.
- Business Use Cases: From quality checks in manufacturing to visual search in e-commerce, the applications are endless.
At Yuvabe Studios, we believe projects like this are a glimpse into the future of AI: moving out of research papers and into the hands of businesses, creators, and communities.
Want to build AI-powered apps tailored to your business needs? Let’s talk.